How Can We Help?
Transaction – How to make transaction
Introduction
Making transactions is the basic procedure of conducting the business model of the BIG POS application. Make transactions that allow the purchase of products by customers and acquire revenue for the company. This section introduces how to use the Make Transaction feature in BIG POS Lite and Pro.
How to make transactions?
To start making a transaction, follow the following steps:
- Add any available products into a cart by clicking on a product within a product category.

- After step 1, specify the quantity of the selected products, then proceed to click on ‘ADD’ to add the product to the cart. The middle input field is used for adding extra notes to the product.

- (Lite) Upon successfully adding a product, the cart icon on the top right corner will display the amount of the order currently in the cart. Clicking on the cart will proceed to the cart checkout, otherwise, the user can continue adding more products to the cart by following steps 1 and 2 again. For the Pro version, the added item will be directly shown in the cart on the right hand side of the display.

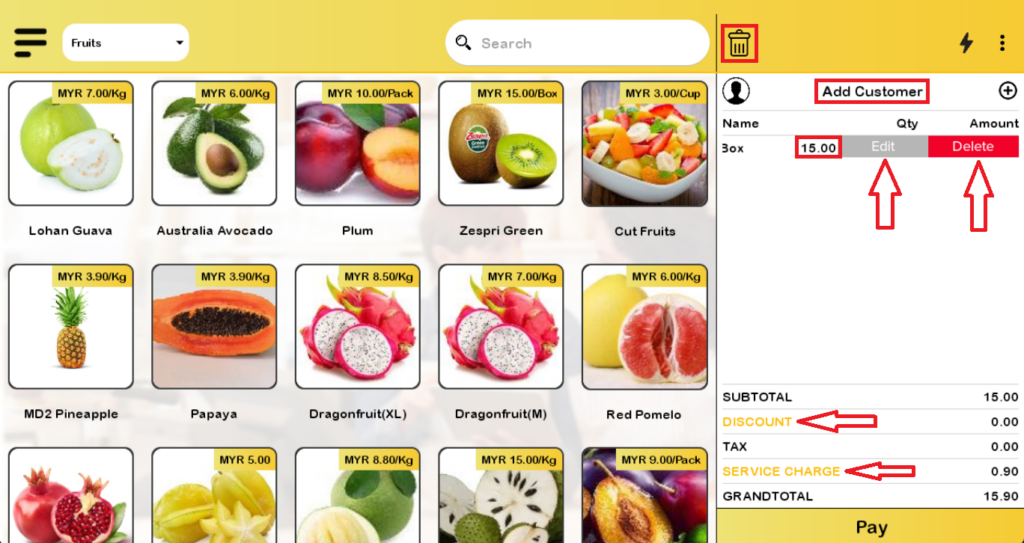
- The screenshot below is the cart checkout screen.
- (Lite) Upper left corner is the return button to redirect the user back to the product selection screen as in step 1.
- Upper left corner trash bin icon is used to delete the entire cart, ‘Add customer‘ is to associate a registered customer to the current cart, which is used for record and loyalty point purposes.
- Clicking on the item will display the ‘Product Discount’ screen, which will be elaborated in step 5.
- The grey edit button is to modify the product quantity and add notes as in step 2.
- Red delete button is to delete that single product.
- Clicking on the discount will display the ‘Full Bill Discount’ screen, which will be elaborated in step 6.
- Clicking on service charge will prompt the user whether to enable or disable the service tax as specified in Company Account Setting.
- Product discount can be used to modify the product quantity via the top interface and also discount via the bottom interface. Discount can be a percentage discount or direct discount. Notes can also be added.

- Full Bill Discount can be used to modify the entire cart discount via a percentage discount or direct discount. Similarly, notes can also be added.

- After specifying all the required inputs, the user shall proceed to click on ‘Pay’ at the bottom of the cart screen to enter the ‘Payment page’. By selecting one of the options used by the customer to pay the cart, the app will redirect the user to the finalized payment page.
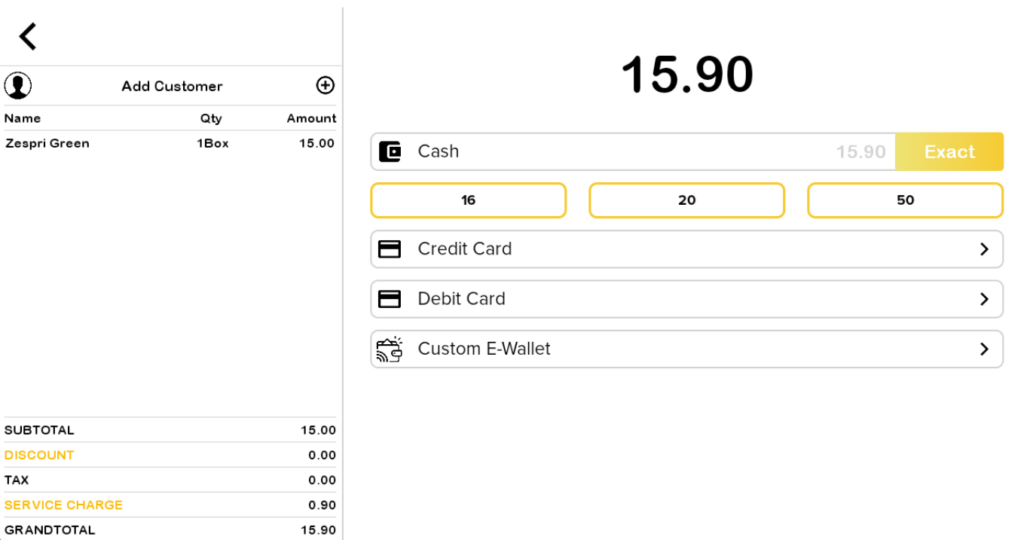
- Finally, depending on the type of payment method used and the amount of money paid (if cash), money change will be displayed. Users can also opt to send an email receipt to the customer or have a printer available to print a physical receipt for the customer.
