How Can We Help?
Tax – Create Tax Page
Introduction
Create tax allows products to be charged an extra tax fee which can be controlled and monitored via the BIG POS Web Admin.
How to ‘Create Tax’?
To begin adding a tax, follow the following steps:
- First, navigate to the Tax main page as shown in Tax Main Page section.
- Within the Tax main page, click on the green ‘Taxes’ on the right which will redirect into the ‘Create Tax Page’.

- After filling all the required inputs, the user shall continue by clicking on
 or cancel.
Tax Details
- Code
Used for naming convention to identify a tax.
- Rate %
Specifies the amount of tax in percentage.
- Status
Used for indicating whether the tax is currently active or inactive.
How to ‘Assign Tax’?
A. New Product
To add tax for a new product, follow the following steps:
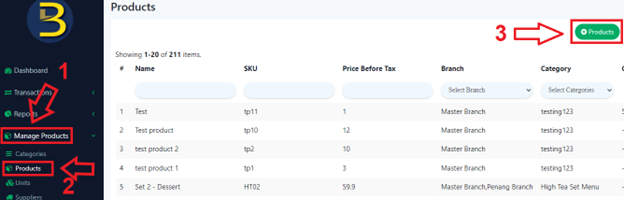
- Head over to ‘Manage Products’ on the left side panel.
- Using the dropdown menu, proceed by clicking on ‘Products’.
- After step 2, click on the green ‘Add products icon’ on the right which will redirect into the ‘Create Product Page’.
- Scroll down until the ‘Pricing’ option is visible.

- Select the tax to be included.
B. Existing product
To begin adding a tax for existing products, follow the following steps:
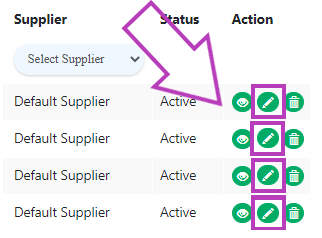
- Similarly, head over to ‘Manage Products’ on the left side panel.
- Using the dropdown menu, proceed by clicking on ‘Products’.
- After step 2, scroll to the right in the list of products until the action column, click on the pencil icon
 in the column where the tax will be added to that product which will redirect the user to the ‘Update Product Page’.
- Follow steps 4 and 5 in Section A to select a tax.
C. Default Tax
To set a default tax, follow the following steps:
- Head over to ‘Settings’ on the left side panel.
- Using the dropdown menu, proceed by clicking on ‘Company Profile’.
- Look for ‘Default Tax’ within the ‘Company Account Setting’.
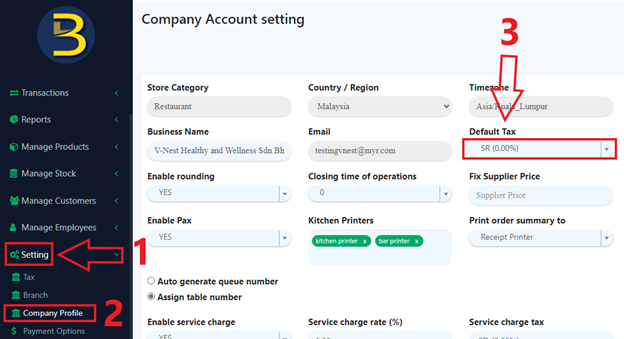
- Select a tax to be assigned as default tax.
- The user shall continue by clicking on or cancel.