BIG Inventory User Manual
Introduction
Big Inventory is a user-friendly inventory management solution designed to streamline stock tracking and optimisation for businesses of all sizes. It offers real-time monitoring, multi-location support, customisable alerts, and detailed reporting to help you manage your inventory efficiently. Seamlessly integrated with other BIGPOS modules, it ensures smooth operations across sales, inventory, and administration.
This manual provides a step-by-step guide to help you effectively use Big Inventory’s features and maximise its benefits.
Installation guide
Android
Search for ‘BiG Inventory’ in the Google Play Store or your device’s app store. The app is about 59 MB in size and can be downloaded for free. It requires an OS version of Android 5.0 and above.
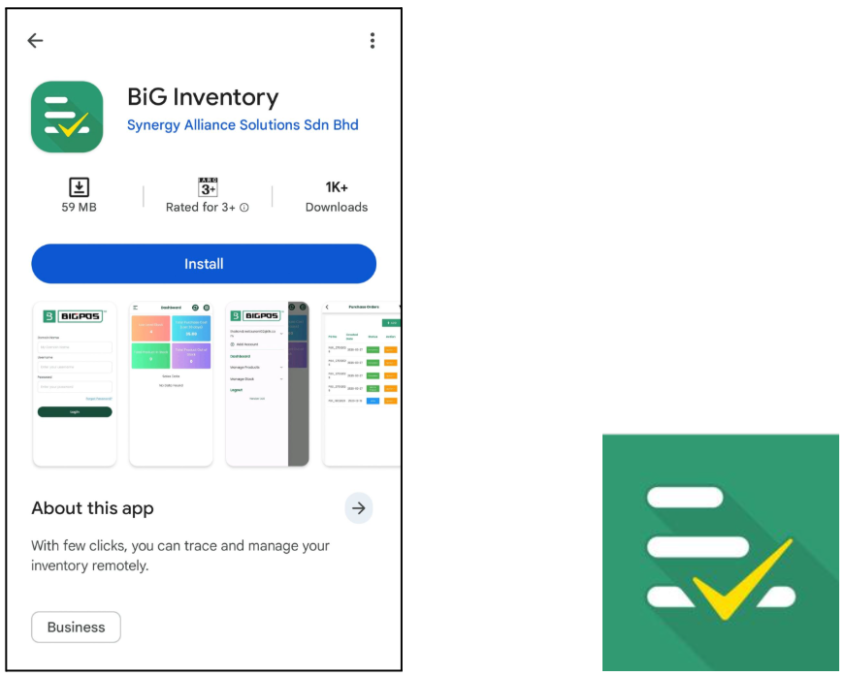
Search results in the Google Play Store Logo of BIG Inventory
iOS
Search for ‘BiG Analytics’ in the Apple App Store. The app can be downloaded for free and has a size of about 86.4MB. The required OS version for this application is iOS 11.0 and above.
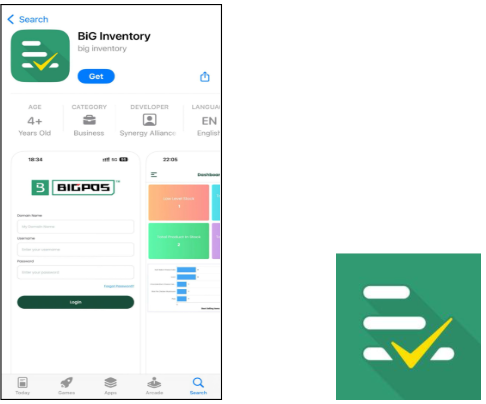
Search results in the Apple App Store Logo of BIG Inventory
User Login
After the installation, the first-time user will be directed to the login page. Before logging into BiG Inventory, a valid user account must be registered for BiGPOS Pro or BiGPOS Lite. The login page requires the assigned domain name, registered username and password to enter the application. After entering all the valid credentials, click on the Login button. By clicking ‘Forgot Password?’ on the login page, you will be directed to the forgot password page. You must enter your domain name and registered email to receive the reset password email.
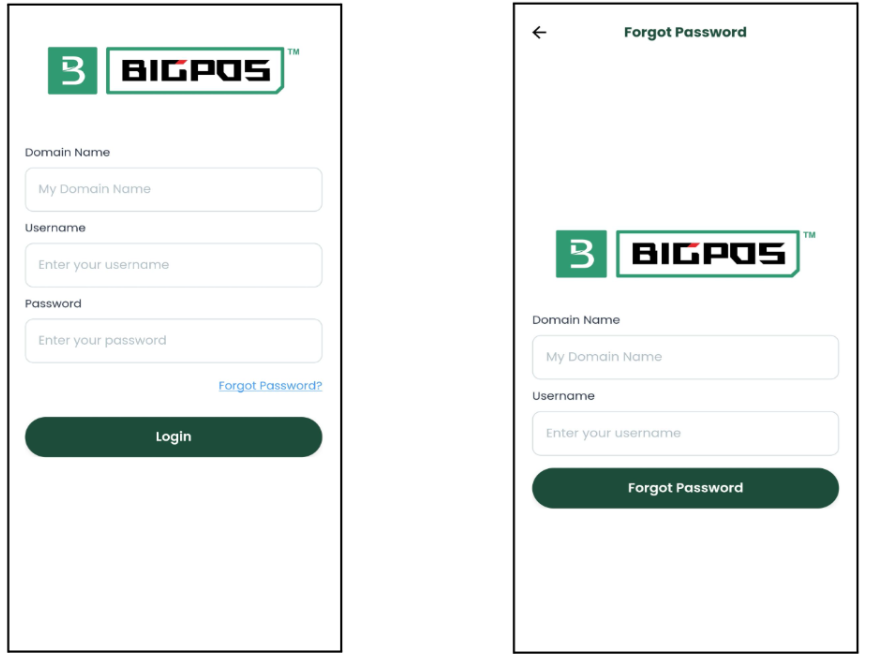
Login page Forgot Password page
Dashboard
The Dashboard serves as a centralized and user-friendly tool for inventory and performance management, providing critical insights and shortcuts to essential functionalities. Its design ensures that users can efficiently monitor stock status and performance metrics, enabling smooth operations and informed decision-making.
Key Functionalities and Insights
- Low-Level Stock: A shortcut to the Urgent Stock list. It allows users to quickly identify products that have reached or fallen below their warning stock level. This feature helps businesses prioritize restocking to avoid shortages and maintain smooth operations.
- Total Purchase: Summarizes the total cost from Purchase Orders over the past 30 days and provides a quick overview of purchasing trends and expenses, enabling businesses to manage budgets effectively and control costs.
- Total Product In Stock: A shortcut to the Product List that also provides a summary of the total quantity of all products currently in stock. It helps users monitor inventory levels at a glance and plan for restocking or redistribution of resources.
- Total Product Out of Stock: A shortcut to the Product List that also displays a summary of all products currently out of stock. It ensures users can quickly identify and address stockouts to avoid disruptions in operations or customer dissatisfaction.
- Best Selling Items Data Graph: Visualizes sales performance over a specific period. It provides actionable insights into sales trends, helping businesses optimize strategies and improve overall performance.
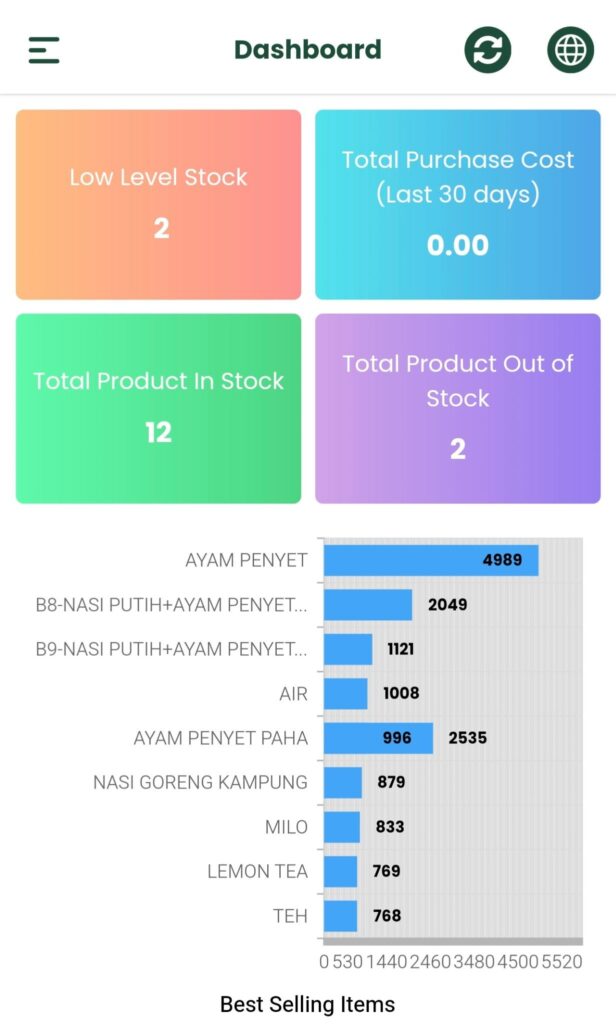
Dashboard
Change Language
By clicking Earth Planet Icon on the top right of the dashboard, the application’s display language will be changed. In the application, there are a few choices of languages that can be chosen by the user which are:
- English (US)
- English (UK)
- Simplified Chinese
- Traditional Chinese
- Indonesia
- Japanese
- Vietnam
- Thailand
- Nepali
- Arab
- Urdu
- Bahasa Melayu
After choosing your preferred language, click on ‘DONE’. The application’s display language changed to the language you choose.
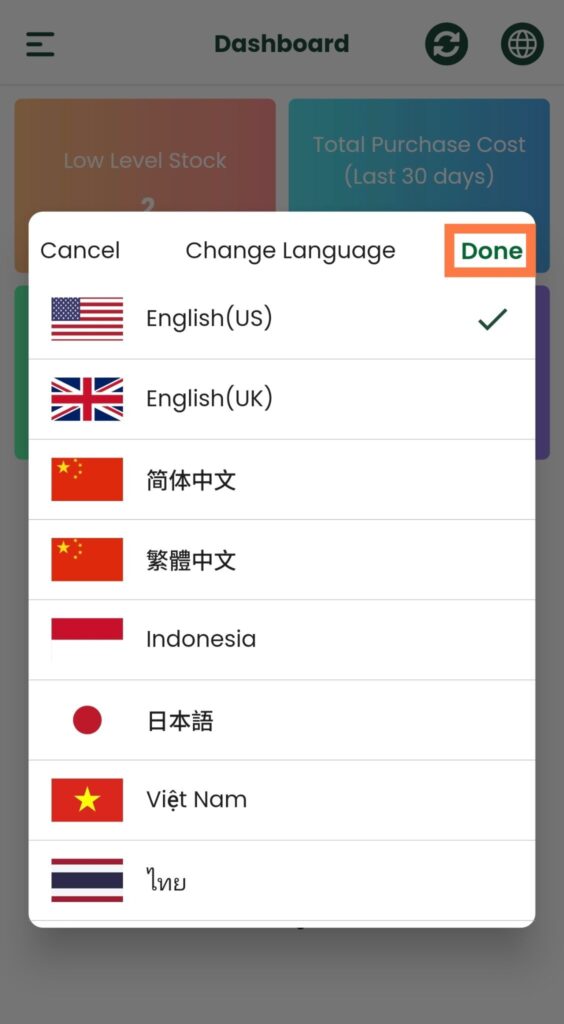
Change languages page
Side Menu
The side menu can be opened by clicking Menu Button Icon at the top left of the dashboard. It shows the account’s username. You can add more accounts by clicking ‘Add Account’ in the side menu. The application will direct you to the login page to enter the credentials of another account. The side menu also allows you to prospect for various available reports related to products and stock.
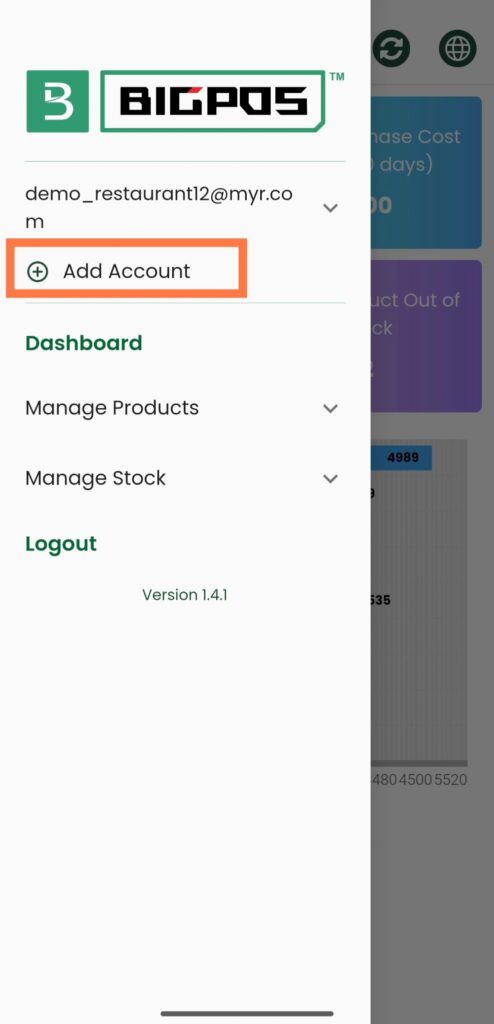
Add another in the side menu
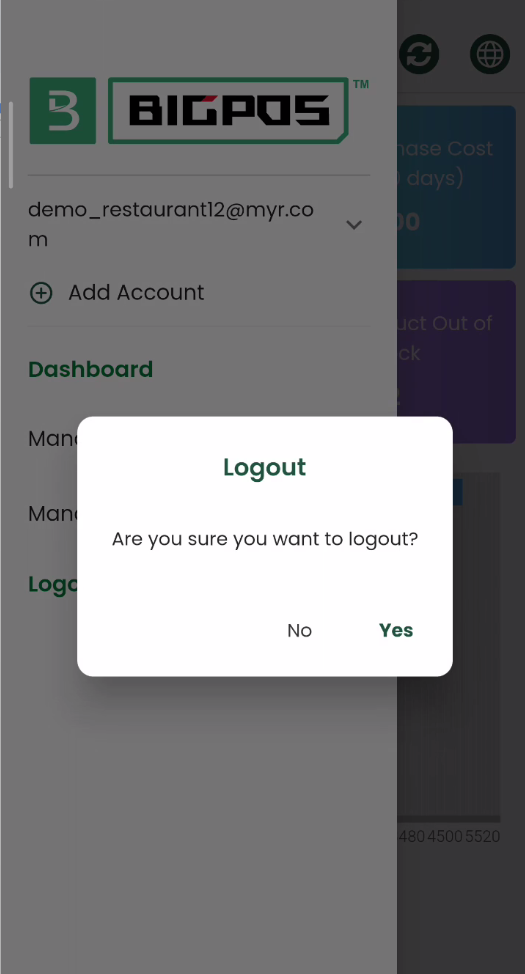
You may log out of your account by clicking on ‘Logout’. A confirmation message will pop up. If you click on ‘Yes’, you are successfully logged out, whereas clicking on ‘No’ will keep you in the dashboard.
Logout confirmation message
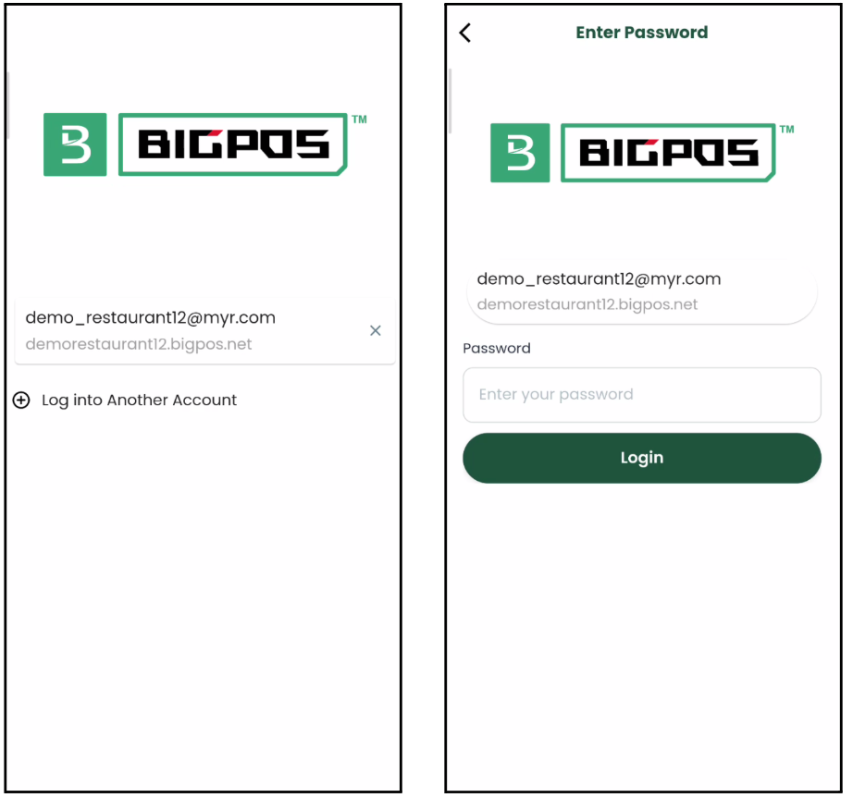
After you log out from your account, the application will prompt you to the login page again. The previous account will be saved in the application. You can choose to log in again by tapping on the username. The application will ask you to enter the password. You can also log in to a different account by clicking “Log into Another Account?” on the login page. You will then be redirected to enter the credentials for the other account.
Log in page after the first login
Manage Products
The Products section in Big Inventory helps you organise and manage your product and supplier lists efficiently. This section ensures your product and supplier information stays accurate and easily accessible for smooth inventory management.

Products-related section in the side menu
Products
The Products page in Big Inventory provides a clear and organized view of your inventory. It displays a list of products with essential details to help users monitor stock levels, product information, and supplier associations efficiently. The products page displayed the name and the quantity of products in hand. By tapping on the corresponding product, the detailed information can be viewed for these informations:
- Cost
- SKU
- Price Before Tax
- Category
- Supplier
- Branch Name
You can filter the products by clicking the icon on the top right of the page to open the filter page. The products can be filtered by:
- Name
- SKU
- Price before tax
- Category
- Branch
- Supplier
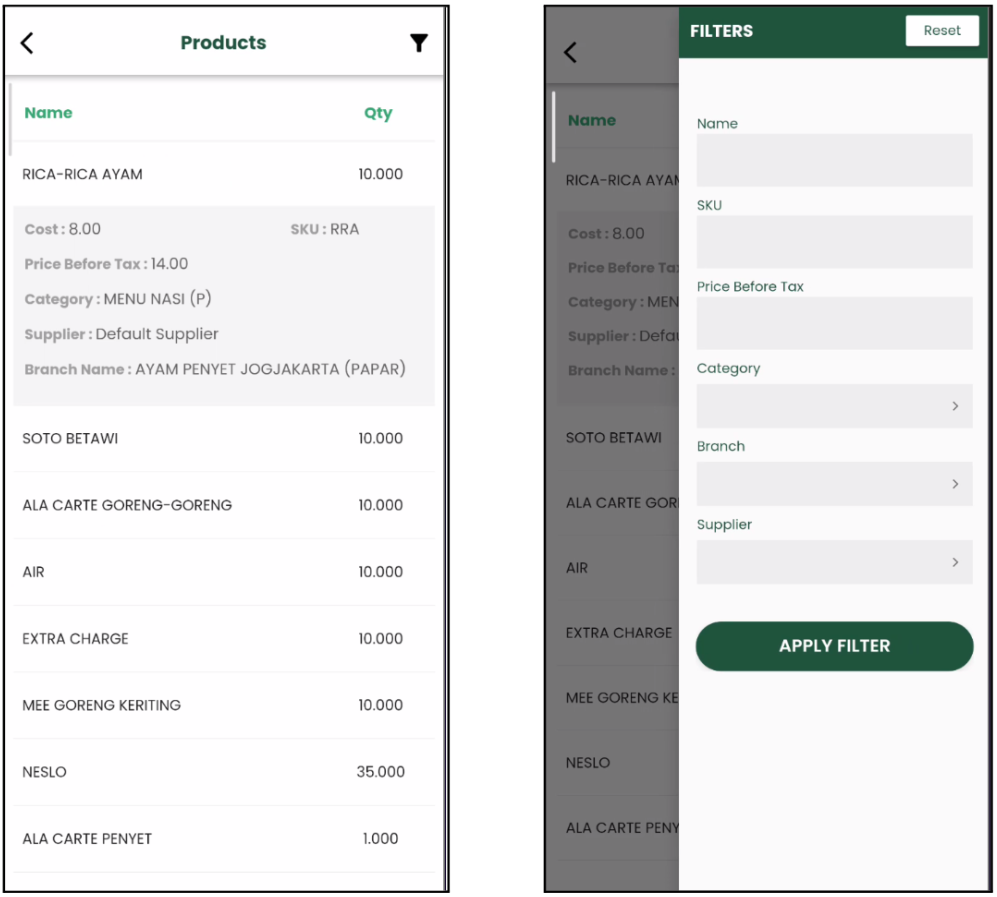
Product Page Product Page’s Filter
Supplier
The Supplier Page in Big Inventory allows users to manage and view details of all suppliers efficiently. The supplier list displays the Supplier Name, Contact Name, and Status (Active/Deactivate) in a clear and organized list. By tapping on a supplier’s name, users can access additional details, including:
- First Name
- Last Name
- Contact Number
- Email Address
You can filter suppliers by first name, last name, contact name, contact number or email for quick access to relevant information by clicking the filter icon on the top-right of the supplier page.
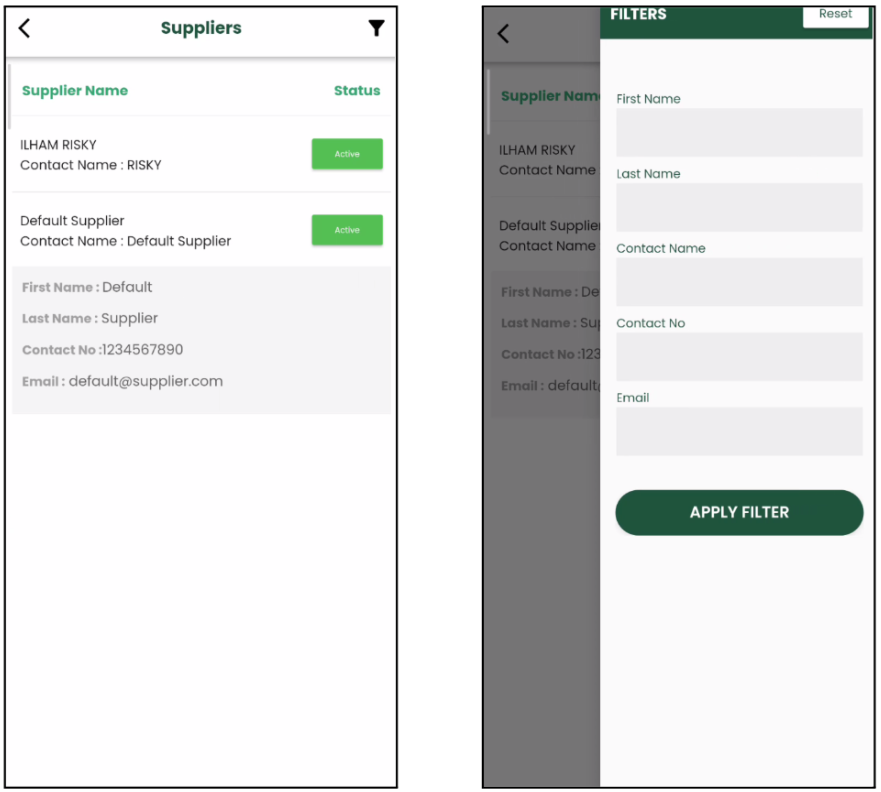
Supplier Page Supplier Page’s Filter
Manage Stock
The Stock section in Big Inventory helps you organise and manage your stock-related processes efficiently. This section ensures your stock information is accurate and easily accessible, enabling smooth inventory management. This section provides all the tools necessary to streamline and oversee stock management effectively.
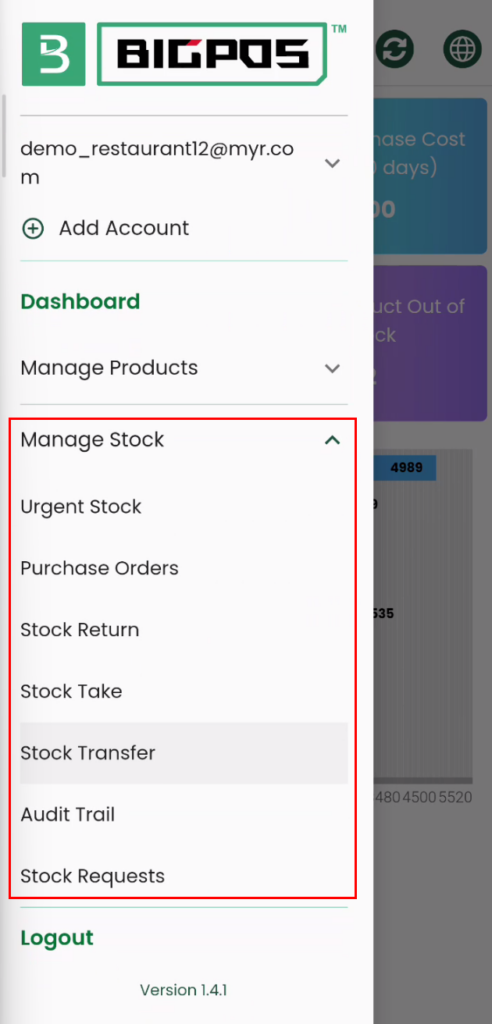
Stock-related section in the side menu
Urgent Stock
The Urgent Stock section in Big Inventory highlights products that require immediate attention due to low stock levels. It helps businesses stay proactive in replenishing critical items and avoiding stockouts. It displays a list of products that have reached or fallen below their warning stock level. Key details shown include the Product Name, Current Quantity and Warning Stock Level. By tapping on a product, users can view additional details to make informed decisions, including:
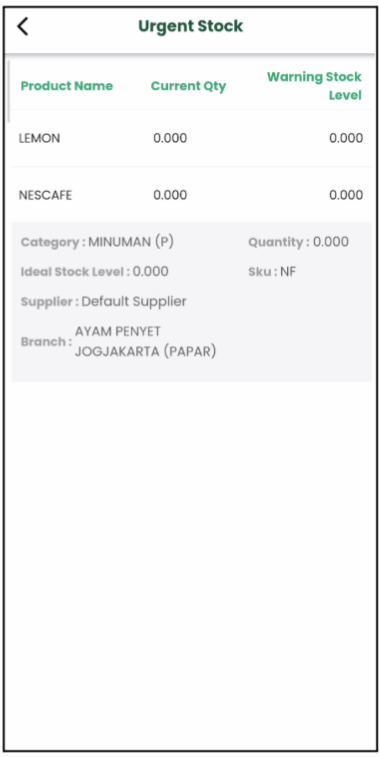
Urgent Stock Page
Purchase Orders
The Purchase Orders (PO) page in Big Inventory provides a clear overview of all purchase orders, helping users manage and track their procurement process effectively. The list of purchase orders displays key details for each purchase order:
- PO Number: A unique identifier for each purchase order.
- Created Date: The date the purchase order was created.
- Status: The current status of the PO
– Open: The newly created PO
– Mark As Shipped: The ordered stock is shipped
– Partially: Only some of the products received
– Completed: All the ordered products received - Option: Quick access to available actions for each PO, such as Receive Items, Mark As Shipped, Completed and View
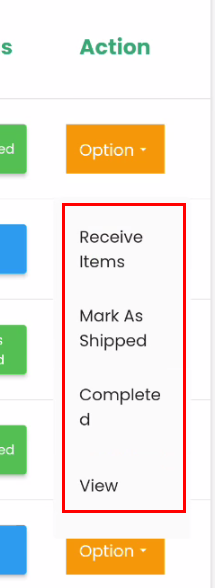
List of actions from the option drop-down button
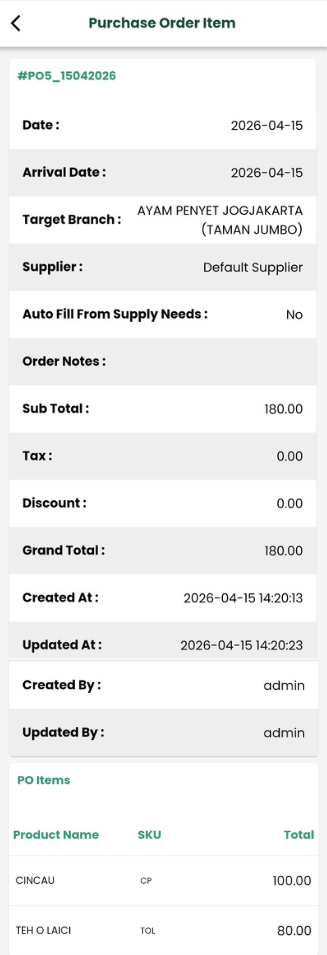
By selecting a purchase order, users can access more information, such as:
- Target Branch
- Tax
- Supplier
- Discount
- Grand Total
- Date
- Order Notes
- Arrival Date
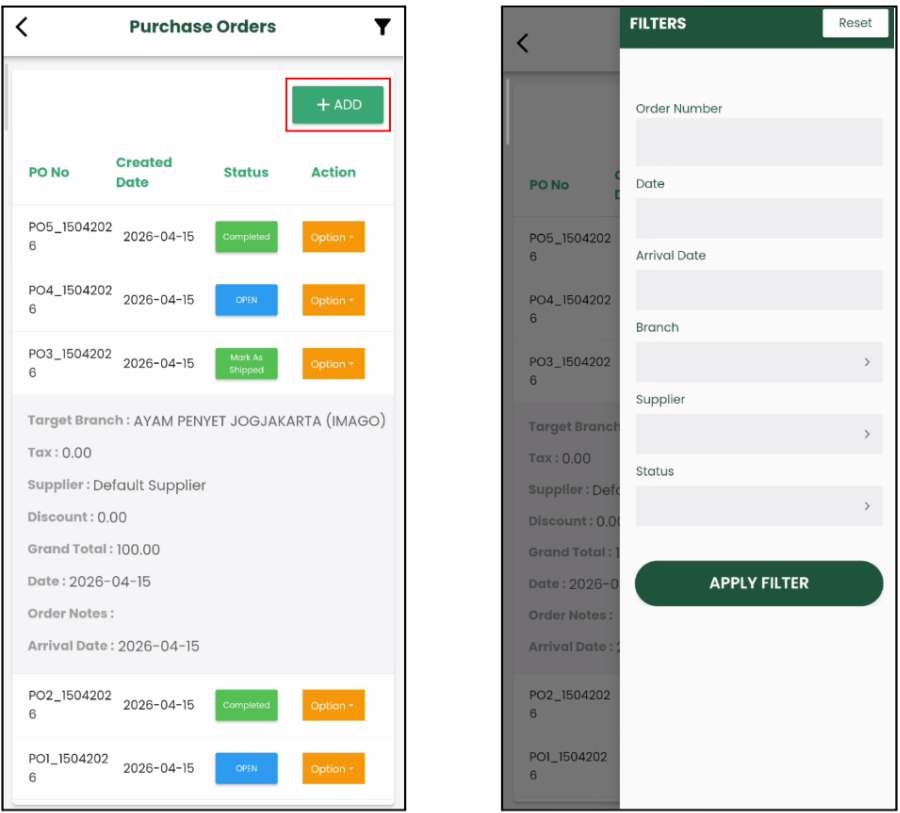
Purchase Orders page Purchase Orders filter
The Add button on the Purchase Orders page allows you to add the purchase orders in BIG Inventory without opening the Web Admin. The application will direct you to the Create Purchase Orders page after clicking on the Add button.
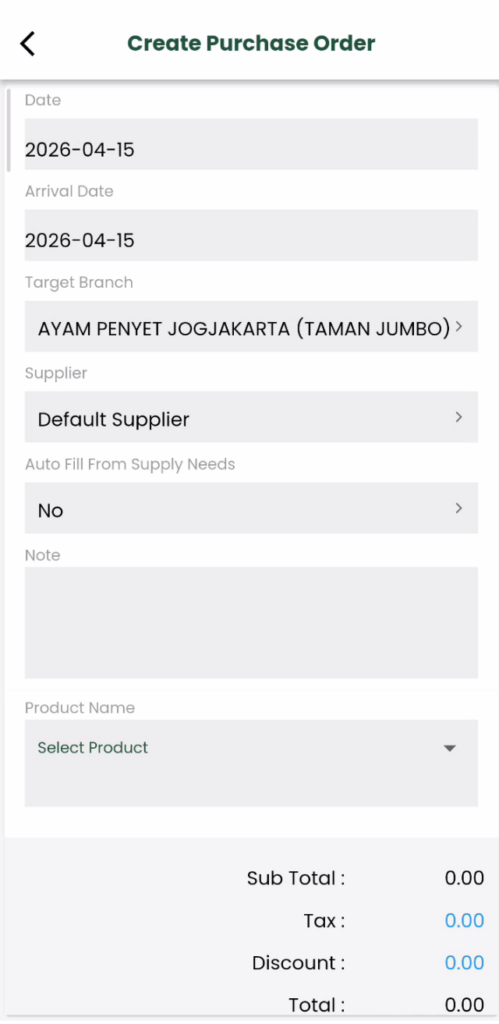
Create Purchase Order page
The information must be filled in on the page to create a purchase order.
- Date: Date of Creating PO
- Arrival Date: Estimate stock Arrival Date
- Target Branch: Destination of PO
- Supplier: Company/ Organization that provides stocks
- Auto Fill From Supply Needs: When the Supplier is chosen and the selected option is ‘Yes’, stocks that are running low will be added to the list.
- Note(Optional): Short message for the supplier
- Product Name: If “Auto Fill From Supply Needs” is chosen ‘Yes’, the product and the quantity will be automatically added to the list to reach the ideal stock level. Vice versa, the product and the quantity must be entered manually.
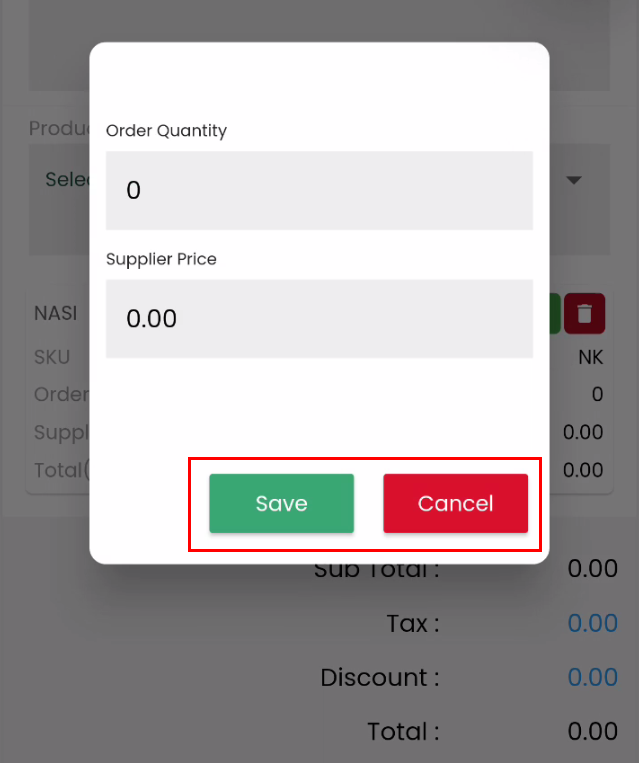
Manually select products and order quantity
After filling in all the information, don’t forget to click Save Button to save the purchase order. If you want to cancel this purchase order record, click the Cancel Button.
View Purchase Order Page
The PO with the status ‘OPEN’, ‘PARTIALLY’ and ‘MARK AS SHIPPED’ can open the Receive Items page to verify the item received from the supplier. You can update the quantity of stock received from the supplier. From the image below, the first “Receive Qty” represents the quantity of stock received during the first delivery when the PO is partially complete. The second “Remaining Quantity” indicates the balance of stock received in the next delivery, after which the PO will be considered complete.
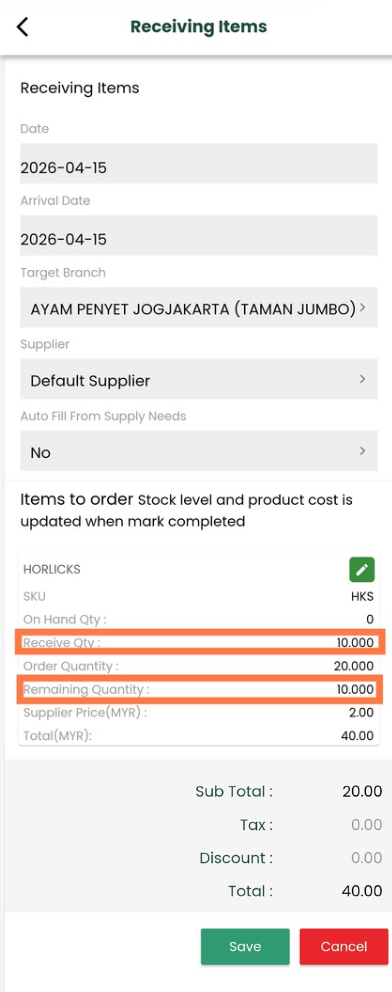
Receive Items page
Stock Return
The Stock Return section in Big Inventory enables users to manage and track the process of returning stock items to suppliers or transferring them out of inventory due to damages, expiration, or other reasons. It ensures efficient handling of returned items and maintains accurate stock records. The Stock Return List displays an overview of all stock return records with the following details:
- SRID: A unique identifier for each stock return entry.
- Created Date: The date when the stock return was created.
- Status: The current status of the stock return
– Open
– Completed
– Cancel - Action: Quick-access options to perform actions like editing, cancelling or viewing a stock return. The Stock Return with the status ‘Open’ can perform actions to edit, cancel and view whereas ‘Cancel’ and ‘Completed’ Stock Returns can only perform view actions.
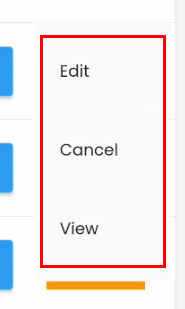
List of actions from the option drop-down button
By selecting a stock return record, users can access more information, such as:
- Return Branch
- Supplier
- Name of Stock Return
- Order Notes
- Date
- Sub Total Amount
- Final Amount

Stock Return page Stock Return filter
The Add button on the Stock Return page allows you to add a stock return record in BIG Inventory without opening the Web Admin. After clicking on the Add button, the application will direct you to the Create Stock Return page.
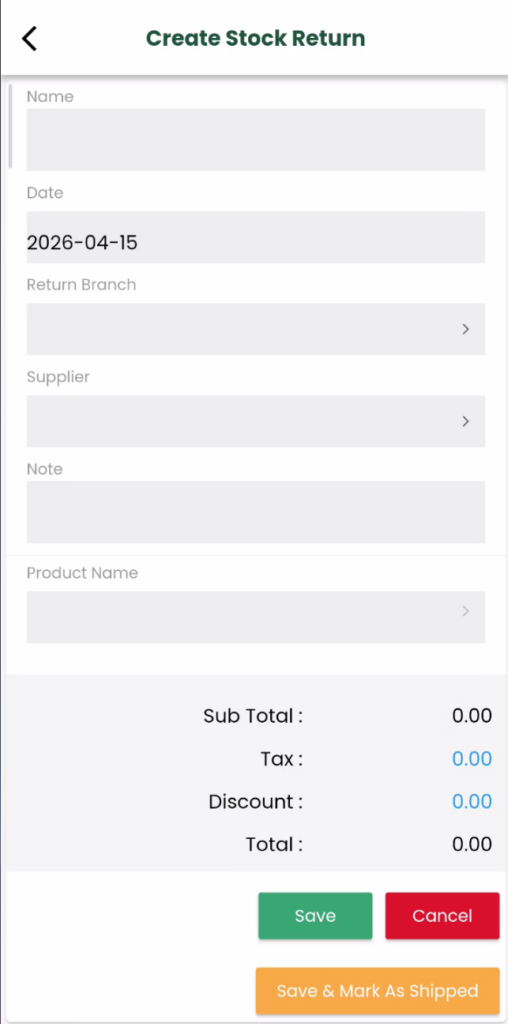
Create Stock Return Page
The information must be filled in on the page to create a stock return.
- Name: Name given to this return process
- Date: Indicates the start date of this stock return operation
- Return Branch: Indicates which branch is returning items
- Supplier: Indicates which supplier will be related to
- Note: Description of the stock return operation
- Product Name: Indicates which items to be returned. The supplier needs to be chosen first before selecting the return items.
- Supplier Price: Cost of items offered by supplier
- Quantity to Return: Indicates how many defeated items wanted to be returned. Click on the Edit Icon to edit the quantity and the supplier price and Delete Icon to remove the selected product.
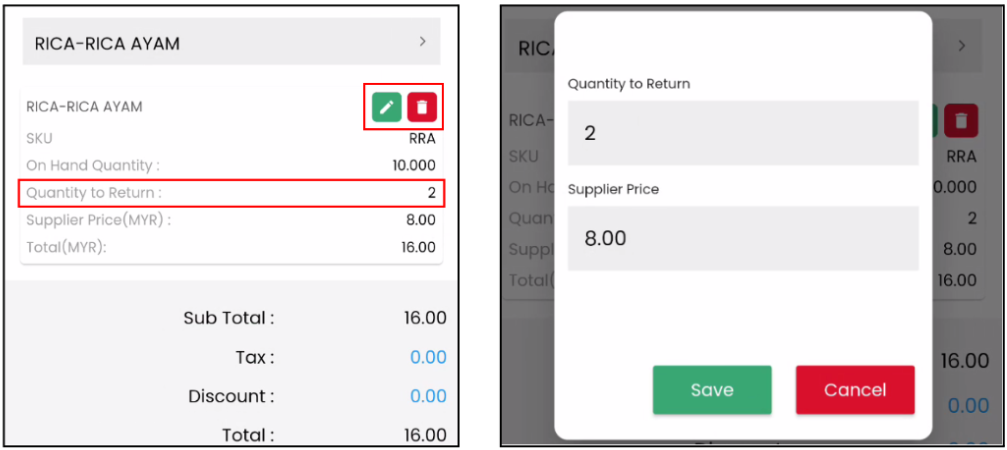
Selected product to return Edit quantity and price pop-up
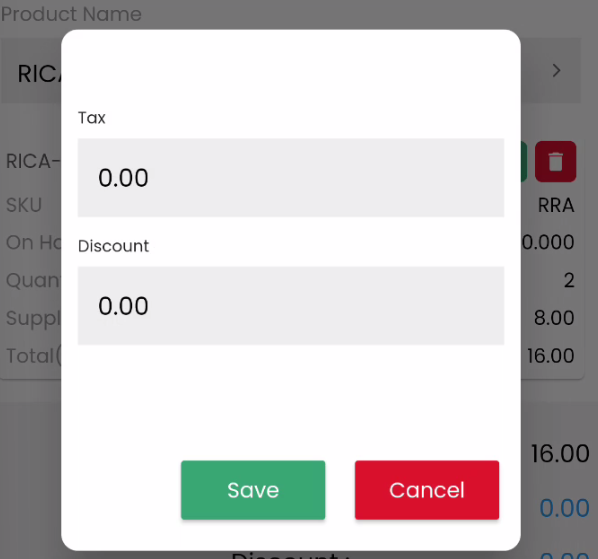
After selecting the product name, you can click the Tax or Discount text. A pop-up window will appear, allowing you to enter the tax or discount amount.
- Tax: Extra value added to state revenue
- Discount: Deduction from the usual cost
Note: Always click Save button to save all the changes made or Cancel button to cancel the changes. After clicking on the Save & Mark As Shipped button, the Stock Return will change to the status ‘Complete’.
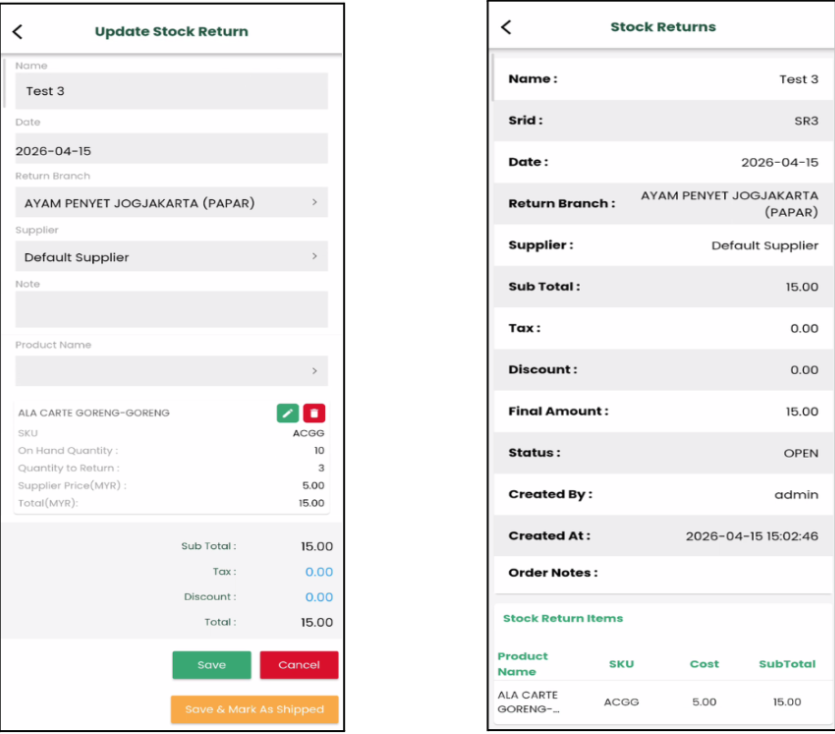
Edit Stock Return Page View Stock Return Page
Stock Take
Stock Take allows users to count and verify on-hand inventory, ensuring that actual stock levels match the recorded quantities in the system. It is a vital process for maintaining inventory accuracy, identifying discrepancies, and ensuring efficient stock management. The Stock Take List provides an organized list of all stock take records with the following key details:
- Created Date: The date the stock take was initiated.
- Status: The current status of the stock take.
– In Progress
– Mark As Completed
– Cancel - Action: Quick-access options to perform actions such as reviewing, or finalizing the stock take. The ‘In Progress’ stock take can view the details and edit the stock count whereas the ‘Mark As Completed’ and ‘Cancel’ stock take can only view the details.
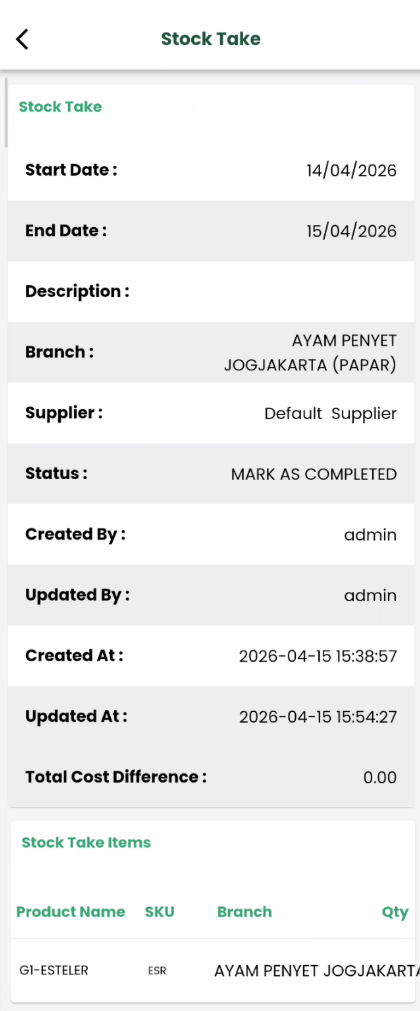
By selecting a stock takes record, users can access more information, such as:
- Branch
- Supplier
- Start date
- End date
- Description
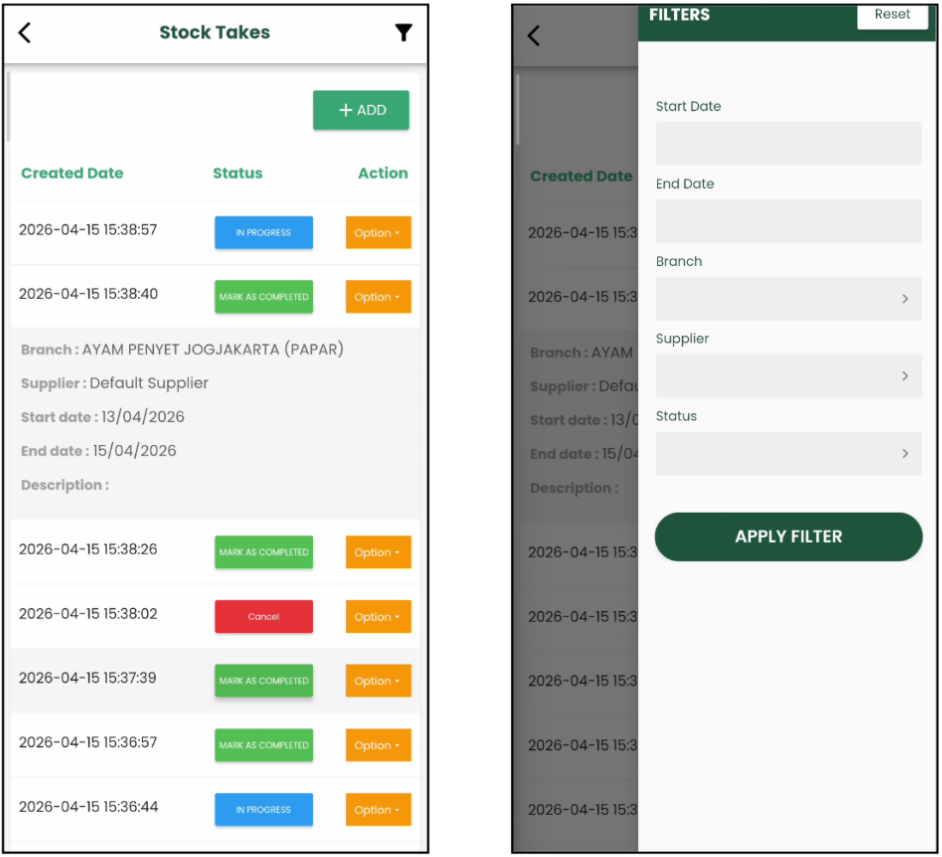
Stock Take page Stock Take filter
The Add button on the Stock Take page allows you to add a stock take record in BIG Inventory without opening the Web Admin. After clicking on the Add button, the application will direct you to the Create Stock Take page.
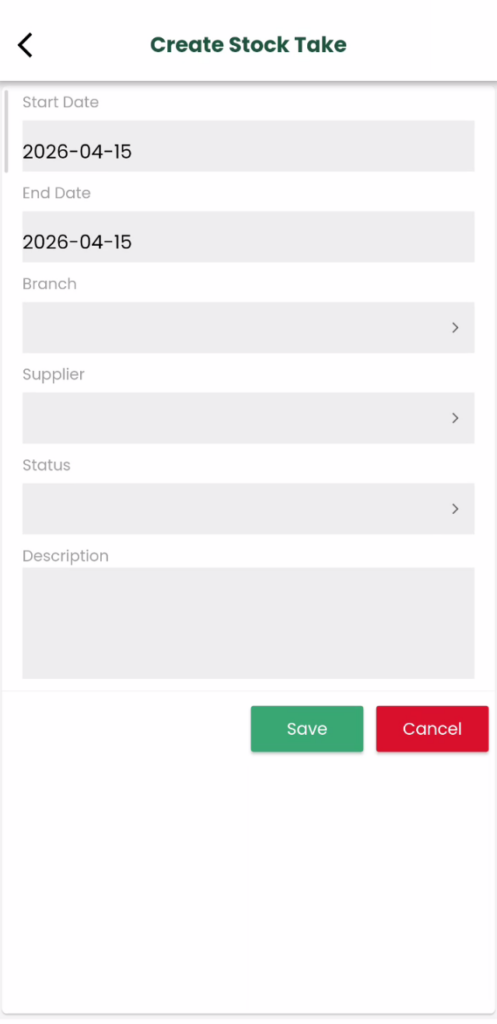
Create Stock Take Page
The information must be filled in on the page to create a stock take.
- Start Date: Indicates the beginning date of the stock-take operation.
- End Date: Dictates the completion date of the stock-take operation.
- Branch: Select which branch the stock-take will be operating at.
- Supplier: Denotes which supplier will be checking the stock-take related to.
- Status: Indicates the current status or behaviour of the stock take.
- Description (Optional): Any relevant information that would be necessary to be added to ease audit purposes.
*Note: The newly created stock take needs to put in the status ‘IN PROGRESS’ first, then enter the ‘Stock Take’ page from the action dropdown list.
Stock Takes page
Inside the stock takes page, there were two sections which are the ‘Uncounted Item’ and ‘Counted Item’ to track whether the stock counting process worked accurately.
Steps for stock-counting:
- By tapping the item, the details of the item such as the barcode and the expected quantity will be displayed. The quantity is also the expected quantity for that item.
- Enter the counted quantity for the corresponding item in the ‘Uncounted Item’ section and tick the confirm box.
- Click Save Confirmed items button to save the process and the items will be moved to the ‘Counted Item’ section.
- Items in the ‘Counted Item’ section will display
- Barcode
- Expected Quantity: Specifies the amount of a product as recorded in the system.
- Difference: The difference in the amount of the expected quantity and counted quantity.
- Cost Difference: The total cost variance calculated based on the quantity difference and the product cost.
- The Undo button allows you to reverse the completed item back to the Uncounted Item section to allow editing again.
- You can pause the stock-counting process by clicking the back button. Then, you can enter the ‘Stock Takes’ page from the action dropdown again to continue.
- Once the stock-counting is done, click on the click on the Mark As Completed button to complete the stock takes the record or Cancel Stock Take to cancel.
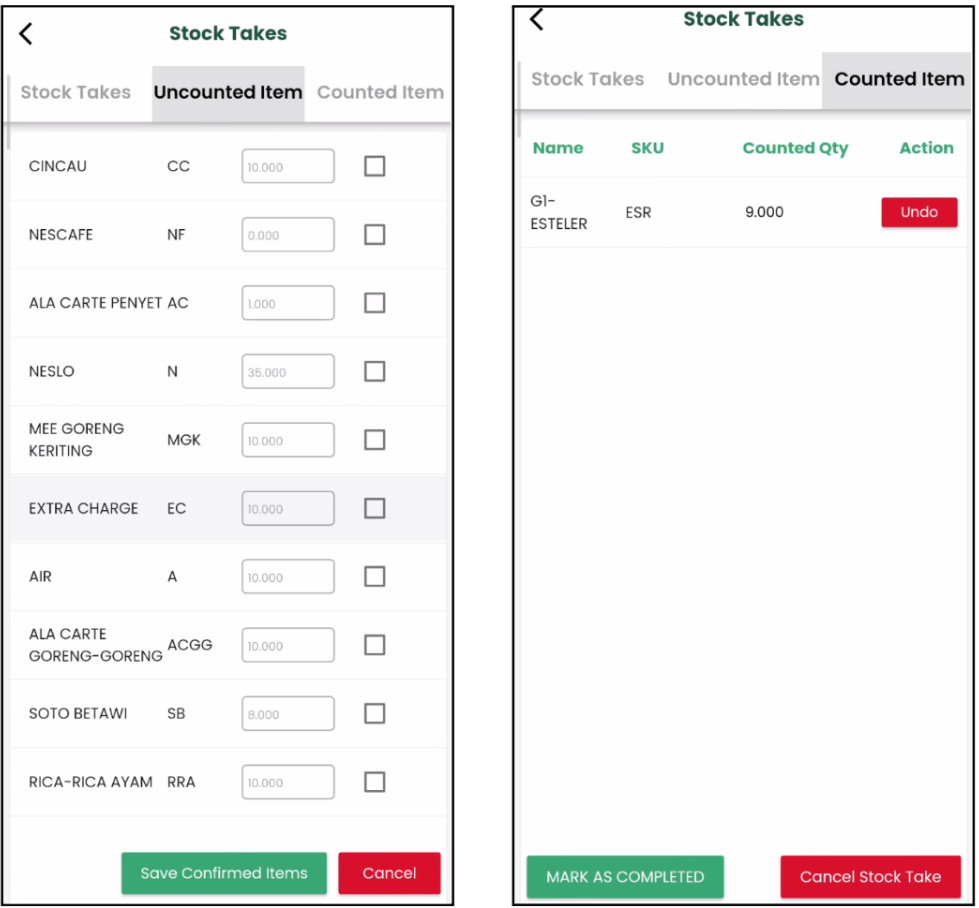
Uncounted Item section Counted Item section
Example video of the counting item process
View Stock Takes page
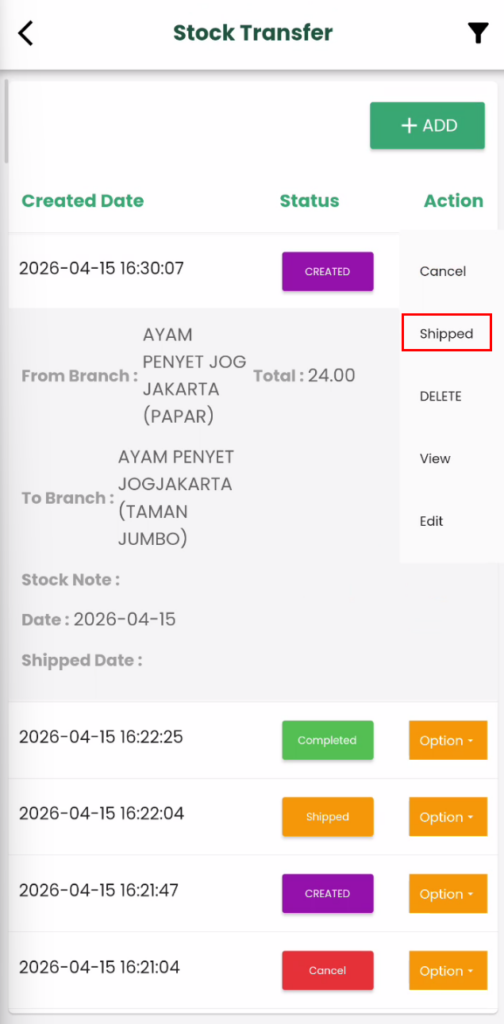
Stock Transfer
The Stock Transfer section in Big Inventory streamlines the process of transferring stock between branches. It simplifies tracking and monitoring of transfers, ensuring accurate inventory levels across all locations. The Stock Transfer List displays all stock transfer records with the following details:
- Created Date: The date the stock transfer request or record was created.
- Status: Indicates the current progress of the transfer
- Created
- Shipped
- Completed
- Cancel
- Action: Provides quick-access options such as
- Change the status of the Stock Transfer (Eg: From ‘Created’ to ‘Shipped’/’Cancel’/’Delete’)
- View the details of the Stock Transfer
- Edit the Stock Transfer details (Only available for status ‘Created’)
*Note: Delete the Stock Transfer record option is only available for the status ‘Created’ and ‘Cancel’
By selecting a stock transfer, users can access more information, such as:
- Stock from which branch
- Stock to which branch
- Stock Note
- Date
- Shipped Date
- Total

Stock Transfer page Stock Transfer filter
The Add button on the Stock Transfer page allows you to add a stock transfer record in BIG Inventory without opening the Web Admin. After clicking on the Add button, the application will direct you to the Create Stock Transfer page.
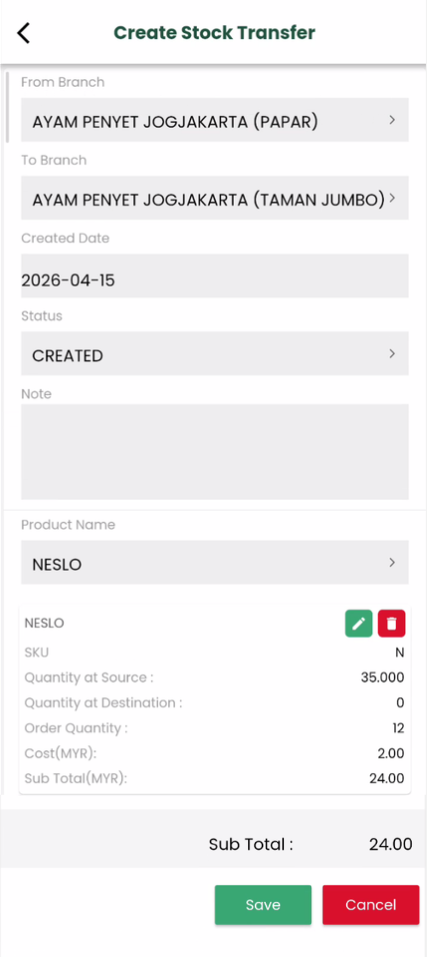
Create Stock Transfer page
The information must be filled in on the page to create a stock take.
- From Branch: Select which branch of the stock transfer will be requesting products from.
- To Branch: Select which branch of the stock transfer will be receiving products.
- Created Date: Specifies the date when the stock transfer is created.
- Status: Indicates the current situation or status of the stock transfer.
- Note (Optional): Description of the stock transfer operation
- Product Name: Select the product that want to transfer between branches
- Quantity: The amount of a product to be requested for stock transfer
- Supplier Price: The supplier amount price of a product
For the stock transfer with the status ‘Shipped’ will be required to enter the shipped date when creating the stock transfer. Click on the ‘Save and Mark Shipped’ button will call the shipped date pop-up for marking the shipped date.
Stock Transfer with click the action ‘Shipped’
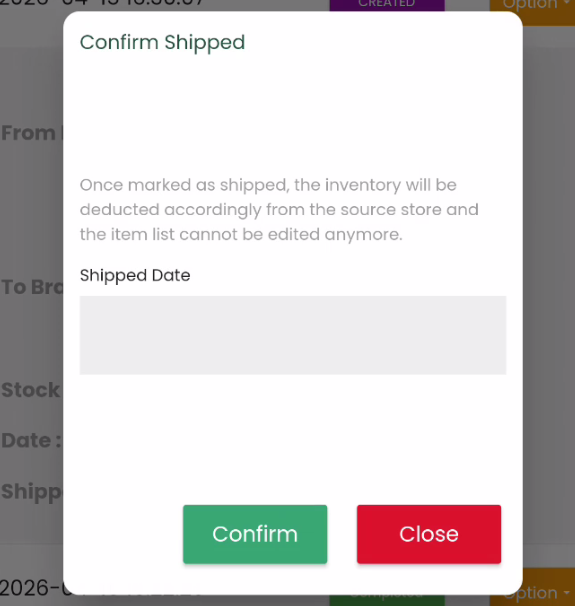
Shipped date pop-up
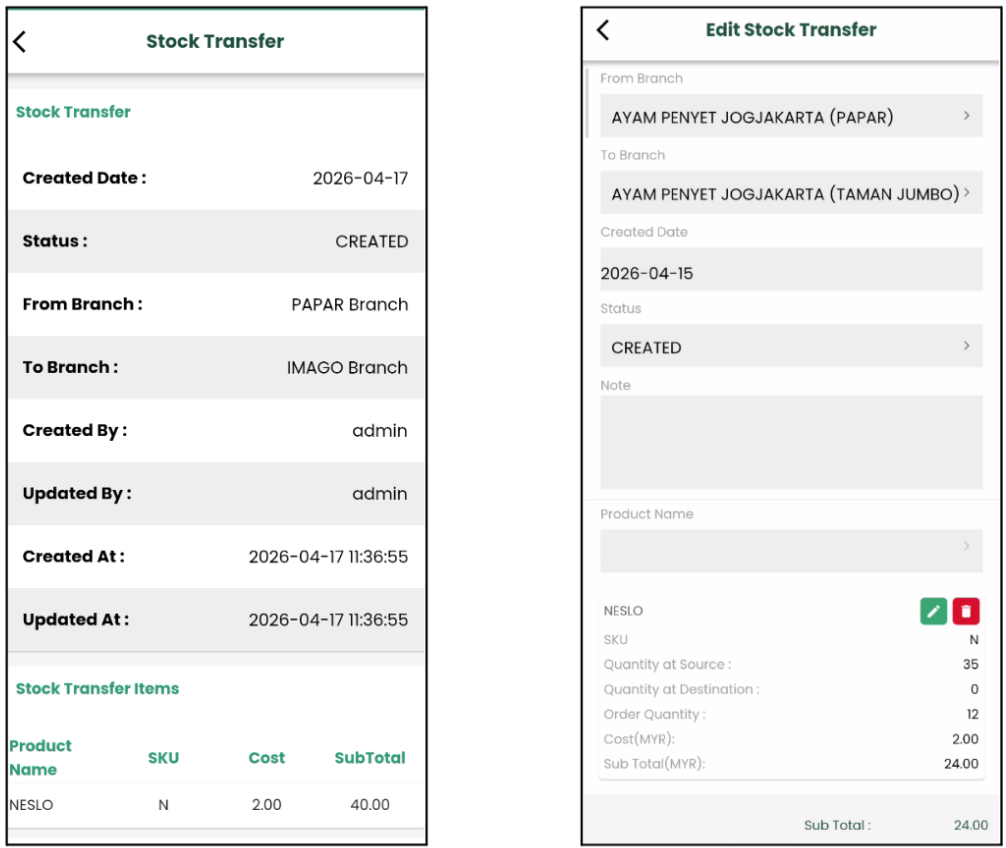
View Stock Transfer page Edit Stock Transfer page
Audit Trail
The Audit Trail section in Big Inventory allows users to create accounting records tracking the sales of specific products within a specific timeframe. This feature ensures accountability and helps maintain accurate records for inventory and financial management. It is an essential tool for businesses seeking to maintain transparent and accurate records of product sales and inventory activities.
Each audit includes:
- Product name
- Audit time
- Employee Name
- Employee’s Last Name
- Quantity before change
- Quantity after change
- Action
- Branch Name
- Change
The Audit Trail page will list all the audits that happened today. You can filter the audit record by specifying the branch name, product name and date. The date is a must to filter the result. You can only filter the date range to find all the audits that happened in that time range or add the specific branch name or product name to precise the filter result.
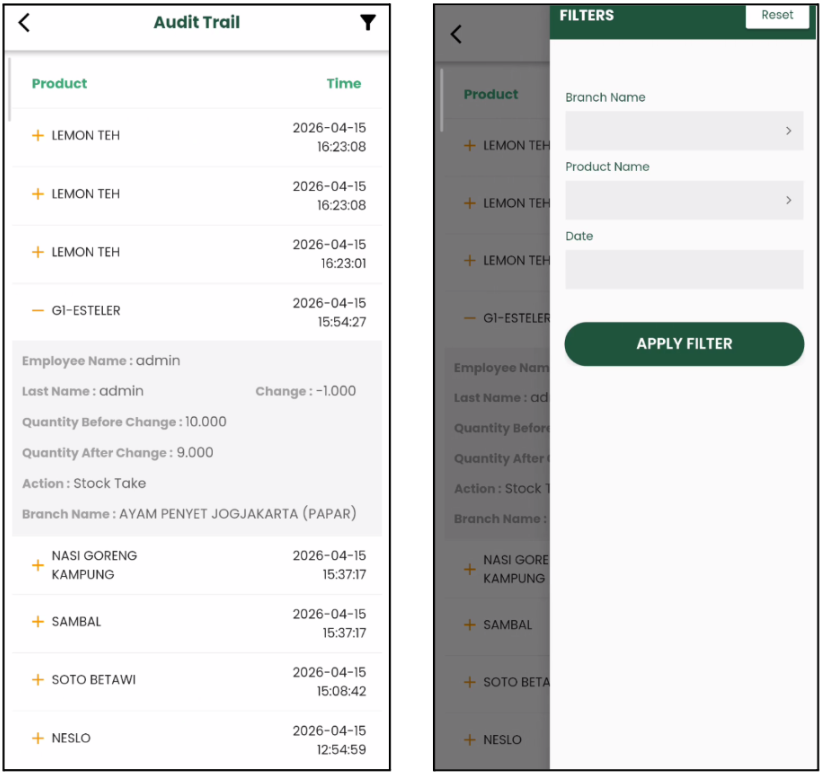
Audit Trail page Audit Trail filter
Stock Requests
The Stock Request section in Big Inventory simplifies the process of requesting stock transfers between branches. It ensures that stock shortages in one branch can be addressed quickly by sourcing from another branch, enabling smooth operations. The Stock Request list displays all stock request records with the following details:
- From Branch: Origin of Stock Request.
- To Branch: Destination of Stock Request
- Status: Current state of Stock Request
- Requested
- Accepted
- Rejected
- Shipped
- Completed
- Cancel
- Action: Quick-access options such as viewing, and editing the request.
- By tapping the stock request record, the created date also will be displayed

Stock Requests page Stock Requests filter
The Add button on the Stock Requests page allows you to add a stock request record in BIG Inventory without opening the Web Admin. After clicking on the Add button, the application will direct you to the Create Stock Request page.
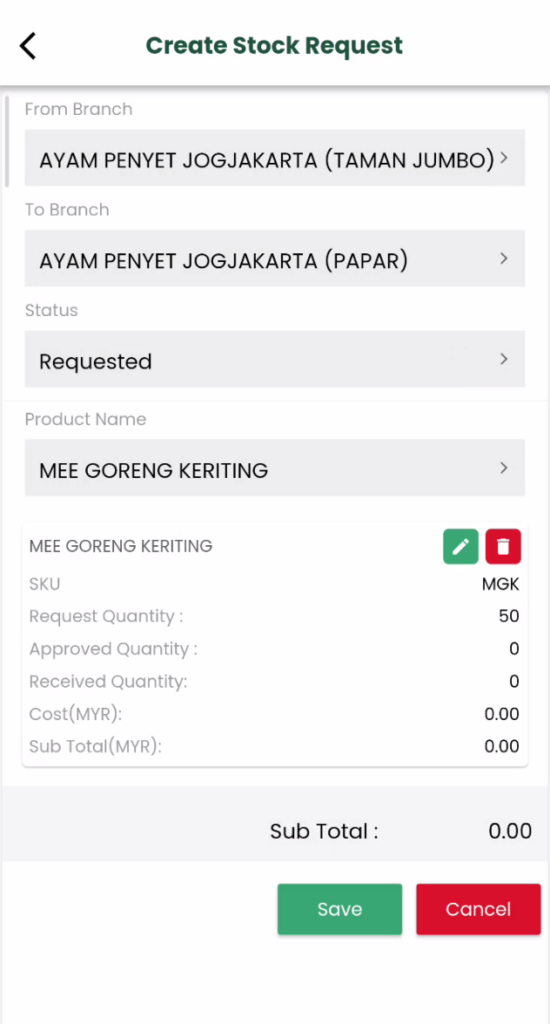
Create Stock Requests
Flow of Stock Requests
The flow of Stock Requests is like the picture below.
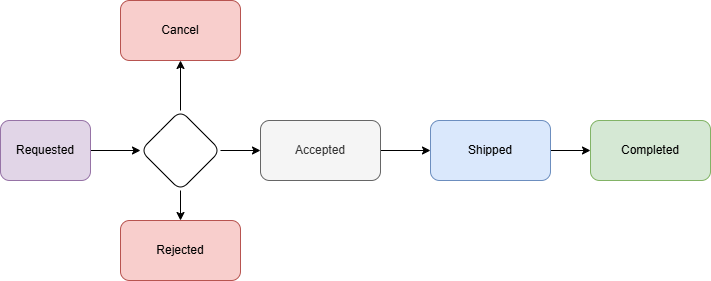
- Requested
This is the initial status when creating a stock request. On the Create Stock Requests page, users can only select the Requested status. The From Branch (origin) and To Branch (destination) must be selected, along with the requested product from the product list. The Requested Quantity field is mandatory and must be filled in. No additional fields are editable at this stage. Once all required fields are completed, click the “Save” button to finalize the stock request.
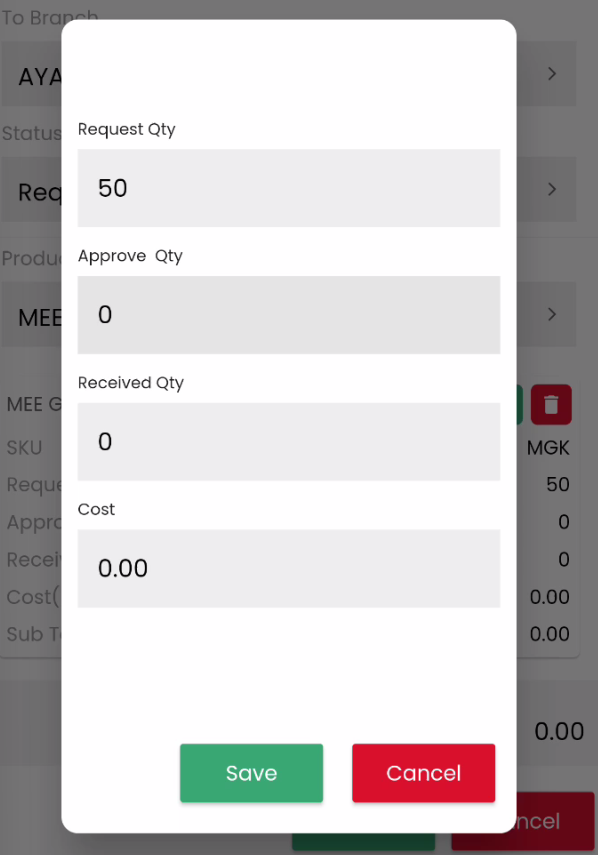
Request quantity pop-up
To change the stock request to the next status, select “Edit” from the action dropdown list. This will prompt you to the Edit Stock Request page. In the status “Requested”, the stock request can be accepted, rejected or cancelled by the origin branch (From Branch).
2. Accepted
When the stock request status changes to Accepted, the Approved Quantity can be updated. However, this quantity cannot exceed the Requested Quantity. Users must first save the status change to Accepted before editing the Approved Quantity. This ensures that only validated stock requests proceed to the next stage. Always click the “Save” button after making changes to keep the updates.
3. Shipped
The status changes to Shipped after the stock is delivered by the From Branch. In this status, users can update the Received Quantity using a pop-up window. It is important to save the status change to Shipped before making any quantity updates. Once completed, click “Save” to record the changes accurately.
4. Completed
When the To Branch (destination branch) receives the stock, the stock request process is marked as Completed. After this status change, no further edits can be made to the request. All details become view-only and can be accessed through the action dropdown list.
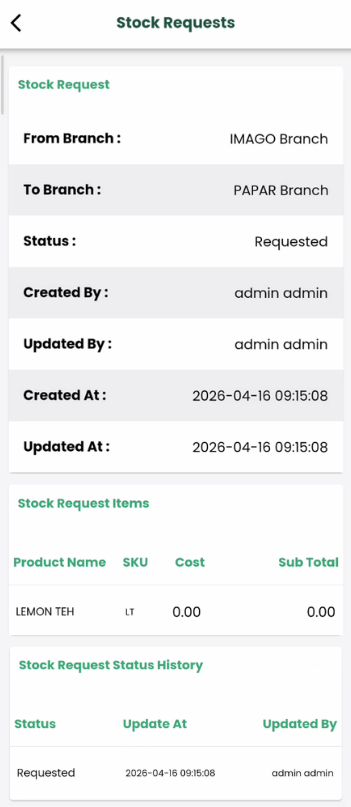
View Stock Request page
5. Rejected
If the stock request is rejected by the From Branch, the status changes to Rejected. This indicates that the request has been declined, and no further action is needed. Once rejected, the stock request process ends, and the details become view-only.
6. Cancel
If the stock request is no longer required, it can be marked as Cancel. This status signifies the termination of the request. Similar to Rejected, no further action can be taken, and the details are only available for viewing.